FDM Migration or Migrating an FDM (Financial Data Quality Management) application between environments, such as from development to test to production, entails numerous procedures to ensure a smooth transfer with no data loss or disruptions. Here’s a general guide to performing this migration:
FDM Migration Procedure
Table of Contents
Before performing an FDM Migration, you need to make sure that you have a full working copy of the file-system and database present in your system.
When copying an FDM application or performing an FDM migration between environments, there are two ways that this can be accomplished:
- Creating a full application, including metadata and data
- Creating a metadata-only application, no FDM data is included
The main difference between the two is whether FDM data is needed or not. If it is needed, then you will want to follow the instructions below for a “Full Application/Database Copy”. If data is not needed and only the metadata (including the maps) are needed, then you can follow the instructions for the “XML Copy”.
XML Copy
It is possible to take a copy of the Application structure while leaving out the data. This would eliminate the need to copy the database and folder substructure. However, please keep in mind that this copy will mean two important things:
- A new application will have to be built from this copy
- There will be no record of any data in this new application
This is the first step in the FDM Migration. In order to take the scaled-down Application copy the Administrator must go into Workbench on the FDM Server:
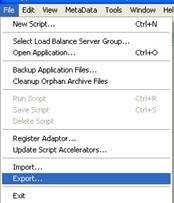
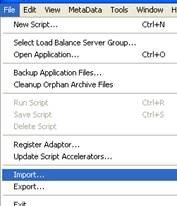
1.) Once in Workbench, click File / Export:
2.) Choose a Name for the file (This is the file that will contain the metadata extracted from FDM).
3.) On the General Tab choose Select All to copy all items.
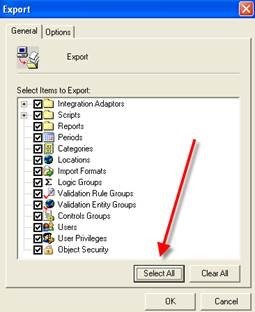
**Note: (Do not hit ‘OK’ yet):
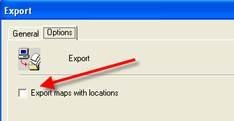
4.) On the options tab, check the box for Maps if you want to copy over the existing Location maps. Please note that copying the maps over will make your file much larger; thus, if the maps are not needed, they should be left out.
5.) Click OK to create the . XML file with your application copy. Next, you will have to create a new application on your new destination server or PC. After doing so, you can load the XML file in much the same way that you took the original export file. Click File / Import and browse to your file:
6.) Choose ‘Select all’ and if Maps were imported, be sure to the Options tab and select Import Maps. Now you have a copy of your Application (sans the data and/or maps) that you are free to use for any and all testing.
Full Application/Database copy
When a copy of an FDM application or an FDM application is needed to be moved between environments for the FDM Migration, and FDM data is needed the following steps should be followed.
The first step when creating a full App/DB copy is to obtain the SQL/ORACLE User Schema that is currently being used as that will need to be copied before the application steps can occur.
Identifying the SQL/Oracle User Schema
1.) Determine the SQL/ORACLE User Schema that is being used by the FDM Application that will be migrated.
- In order to do this, go to the login page for FDM in the appropriate environment. From the drop-down, select Add Application.
- Enter a valid User Name and Password. The Add Application window will appear. Highlight the appropriate application and click Modify.
- The Database tab lists the SQL/ORACLE Database, User Name, and password used for the specified FDM application.
2.) Once the database is identified, the SQL/ORACLE DBA will need to copy the DB from one environment to the next. If the copy is to be kept in the same Environment, then the database will need to be renamed before the copy is completed. Once the User Schema has been copied, the FDM Application steps can begin.
FDM File Folder Copy
After the SQL User Schema has been migrated between applications, the FDM Application Migration steps can occur. FDM stores some data in a file directory structure. The FDM folder structures contain the following elements:
Data Folder – stores archive information and the FDM scripts (Event, Custom & Import).
Inbox Folder – stores data files to be loaded or data files placed on the server.
Outbox Folder – stores the HE .DAT files that FDM produces and loads to HE. Also stores Logs, Templates, and Excel Files.
Reports Folder – stores the FDM Reports.
Each of the folders above is stored in a folder named the same as the application (i.e. FDMPROD Application will have a folder named FDMPROD with the folders underneath). The FDM File folder directory is stored on one of the FDM Application Servers in each environment. Each FDM Application server has a Data shared folder on the D: / drive (or C drive), which stores all of the Application folders.
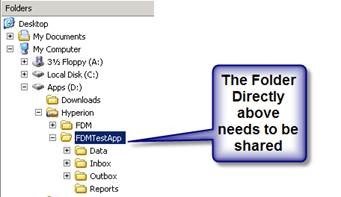
When Migrating the FDM Application, the File Folder directory must be copied. If it is to be an exact copy in the SAME Environment then the PARENT folder must be RENAMED with the name of the App (The database should have the same name)
- If the FDM Application will have the same name in the environment that it will be migrated to, copy the Application folder and all subfolders (Data, Inbox, Outbox & Reports) from the existing environment and paste it into the Applications or Parent folder on the environment to be migrated to.
- If the FDM Application will have a different name in the environment that it will be migrated to, a Folder should be created in the new environment in the Data folder with the name of what the new application will be called. For example, if an application, FDMDEV exists on the Dev environment and it will be migrated to the Test environment and called FDMTEST, a Folder called FDMTEST should be created on the Test environment in the Data folder.
- After the new folder has been created, the sub-folders (Data, Inbox, Outbox, Reports) of the existing application will need to be copied from the existing environment and pasted onto the new environment into the new folder. Using the example above, the Data, Inbox, Outbox & Reports sub-folders under FDMDEV would be copied and pasted into FDMTEST.
Adding the FDM Application
After the database and file folders have been migrated, the FDM Application can be added to the new environment. Use the following steps to add the application:
- From a web browser, enter the URL for the environment where the application will be added.
- From the drop-down, select Add Application.
- Type in a valid user ID and password and click Logon.
- A list of the existing FDM Applications in the environment will appear. Click on the Add button.
- FDM will open the Add Application window.
- In the Name box, enter
- a description for the application (e.g. Test FDM Application).
- In the Path box, enter the full UNC path of the Application folder. (e.g. \\NetworkDrive\FDMDATA\FDMTEST
- After entering if the information on the General Tab, click on the Database tab.
- In the Database tab, enter the following information:
- For OLE DB Provider, select SQLDB.SQL from the drop-down
- the name of the User Schema.
- In the Password box, enter the password.
- After the General & Database tabs have been filled out, click on the OK button.
- The Application will appear in the list of existing Applications in the Add Application box. Click Close.
- Login to the application to verify that it opens correctly.
- The application has been successfully added.
FDM Option Changes
After the FDM Application has been successfully added, some application changes might need to happen. The following steps detail the additional steps that might need to be performed.
Changing the Planning Application Name that the Application is pointed to.
- To change the Planning Application that FDM connects with, login into the application and click on Admin Tasks from the left-hand side menu.
- Inside Admin Tasks, select Integration Settings.
- The first drop-down will list the Application Name. In the App Name box, type in the name of the Planning Application.
- Click Save once the Planning Application Name is listed.
Registering the Adapter
- The Adapter .exe file needs to be registered on each FDM Application server. If a new Adapter is used, or if this is the first application on an environment, the Adapter .exe file will have to be registered.
- To perform this, open up the Workbench Client directly on the FDM Application Server. This process will have to be repeated for each FDM Application server.
- Login to the Application through the Workbench Client. Once inside the Workbench Client, go to File \ Register Adapter.
- Browse to the Adapter.exe file and click Open. FDM will return a message that the Adapter was successfully registered.
Adding/Changing the Machine Profiles:
- The Machine Profile of both the Source and Target System needs to be updated for each server in the migrated environment
- To perform this, open up the Workbench Client directly on the FDM Application Server. This process will have to be repeated for each FDM Application server.
- Login to the Application through the Workbench Client.
- Once inside the Workbench Client, click on the ‘Adapter’ Tab at the bottom of the page.
- Expand the Planning Adapter.
- Right-click on the ‘Machine Profiles’ folder and select ‘Add Machine Profile’.
- Add BOTH a Source AND Target machine. Click OK.
Note: The Machine Profile process needs to be repeated for every application server that FDM is installed on.
You can now verify that you can connect to the Planning application by trying to add a map and browse the members. This will let you know if you are integrated properly with the Planning application.
Read another article on FDMEE Mapping Migration Issues.
Also, read about FDM-FDMEE Migration Utility.
Leave a Reply